Herst.-Teilenr. 28370
TEENSY 4.1 WITHOUT ETHERNET WITH
SparkFun Electronics
The Teensy 4.1 is brimming with advanced features that make it a powerful platform, and it is sure to benefit most electronics projects. This article discusses how makers can get started with Teensy using the Arduino IDE.
The Teensy 4.1 is a gum-stick-sized development board with features that other development boards can only dream of. Its ARM Cortex-M7-based microprocessor delivers performance that’s unparalleled in the DIY scene at its price point. The CPU is clocked at 600 MHz, and it includes numerous supplementary features, such as a floating-point unit (FPU) to support 32-bit and 64-bit operations, cryptographic acceleration, a hardware random number generator (RNG), a pixel-processing pipeline, and a real-time clock (RTC) for timekeeping.
The board’s connectivity options are what stand out most to makers. The Teensy 4.1 can act as both a native USB host and a regular USB device. This ability allows the device to function as a USB peripheral and also receive input from other USB devices, such as a keyboard or mouse. Optional Ethernet support makes it viable for IoT applications.
 This image shows the pin diagram of the Teensy 4.1.
Image courtesy of PJRC.
This image shows the pin diagram of the Teensy 4.1.
Image courtesy of PJRC.
The Teensy 4.1 has 55 digital I/O pins—out of which 35 support PWM—18 analog inputs with a resolution of 12 bits, eight serial ports, three SPI interfaces, and three I2C channels. Most notably, it’s one of the few maker-grade boards to include CAN capabilities, offering three CAN bus channels with one supporting CAN FD. Additionally, the device contains a standard Arduino-compatible SD card slot.
The Teensy 4.1 offers 7936K of flash memory and 1024K RAM with two additional QSPI memory expansion slots that can be used to add more storage. Three hardware timers, three watchdog timers (WDTs), a clock cycle counter, multiple generic timers, and a systick timer enable precise, timing-based applications.
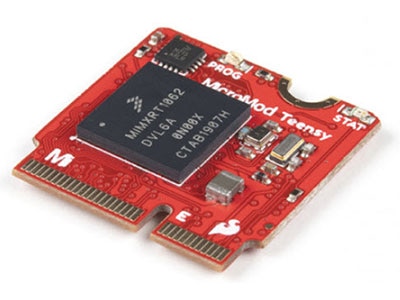
 This image highlights the connections for the Ethernet and host USB interfaces. It also shows the pads for adding extra memory. If only one PSRAM chip is used, it must be soldered to the smaller pads. The group of larger pads may be used with certain flash memory chips that support the LittleFS library.
To get started, open the Arduino IDE and then navigate to the application settings:
 Use the highlighted menu entry to open the Arduino IDE settings.
 Use the highlighted button to open the additional board manager URLs dialog window.
Then, add the following URL to the end of the list:
https://www.pjrc.com/teensy/package_teensy_index.json
If you already have existing entries in the list, make sure to add the new one in a new line:
 Add the new entry to the list, as shown in this screenshot.
Click the “OK” button to save the changes. Once you add the additional board manager URL, the Arduino IDE can find and download the required board manager files for the Teensy line of boards.
Bring up the boards manager to install the SDK for the Teensy 4.1 by clicking the following button in the left toolbar. Then, search for Teensy, and select the library by Paul Stoffregen:
 Follow the steps shown in this screenshot to install the Teensy board manager files.
Wait for the installation to complete. On Windows computers, you may encounter a “file does not exist” error. If this happens, close any other Teensy loader windows and repeat the installation. Note that this only applies if you have installed the Teensy Loader. Sometimes, the IDE may also stall during the installation. In this case, you can close the Arduino IDE serial monitor and retry.
After installing the Teensy board files, you can select your model from the list of available boards:
 Select the Teensy model you want to use from the list of available devices.
Then, select the port in the Arduino IDE:
 Connect the board to your computer and select it from the ports list.
Lastly, compile and upload a basic sketch by using the upload button in the IDE. Doing so will open a small window that prompts you to push a button on the board:
 Click the upload button (1) and wait for the process to finish. Make sure that the auto button (2) in the pop-up dialog is green.
 Press the white button on the top side of the Teensy to proceed with the upload.
The two most important things to keep in mind when working with a Teensy are that it’s exclusively a 3.3V-only board. It can only output 3.3V, and all input signals must not exceed 3.3V to prevent damaging the electronic components on the board.
Similarly, the ADC and DAC resolutions can be set using the standard analogReadResolution or analogWriteResolution functions. However, the analogReference method has no effect on the Teensy 4.1.
The Teensy 4.1 can be powered using an external power supply with a voltage between 3.3V and 6V through its VIN pin. However, it must not simultaneously be connected to a computer via the micro-USB port without cutting a trace on the PCB to prevent damage to the connected computer or the board.
In addition, some of the advanced features may not be available via the Arduino API or any official libraries, and they can only be utilized by directly programming the MCU through JTAG. This GitHub page collects more useful tips, tricks, and common pitfalls.
The Teensy 4.1 is an immensely powerful yet cost-effective Arduino-compatible board that greatly outperforms most other maker-grade boards. It boasts a fast CPU with numerous hardware accelerators and impressive connectivity options. However, you have to keep in mind that advanced feature support is limited when using the Arduino IDE. Further, you must also remember that the Teensy 4.1 is only 3.3V compatible.
To get started with Teensy, you must enter an additional board manager URL in the Arduino IDE. Doing so points the IDE to the right location when searching for the Teensy board support files. After installing these files, you can program the Teensy in the Arduino IDE as usual.
It may be necessary to push the physical flash button on the board when uploading a sketch. The Arduino IDE shows a prompt and pauses the upload in case users must push the button.