Mfr Part # 4800
ADAFRUIT MAGTAG - 2.9" GRAYSCALE
Adafruit Industries LLC
License: None Displays LCD / TFT Wireless
Guide by Tim C
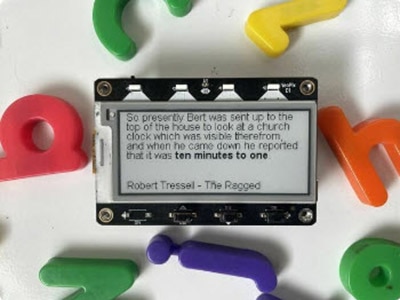
This clock runs on the MagTag and displays the time using quotes from books. Nearly every minute of the day has one or more quotes to choose from. The clock updates once per minute to display a quote that references the current time. The most relevant portion of the quote, the bit that references the current time, is rendered with outlined font to make it easier to find at a glance.
The inspiration for this project was this Literary Clock made from an E-reader posted on Instructables by tjaap. There is also a website version of it created by Johannes Enevoldsen. All of them were made possible by an initiative from The Guardian, who crowd sourced the quotes by asking their readers to find and submit them.
Make sure that you update the TinyUF2 Bootloader before installing CircuitPython!
Adafruit MagTag
By Kattni Rembor
Update TinyUF2 Bootloader for CircuitPython 10 and Later
CircuitPython is a derivative of MicroPython designed to simplify experimentation and education on low-cost microcontrollers. It makes it easier than ever to get prototyping by requiring no upfront desktop software downloads. Simply copy and edit files on the CIRCUITPY drive to iterate.
Follow the steps to get CircuitPython installed on your MagTag.
CircuitPython UF2 Download for MagTag
CircuitPython BIN download for MagTag
WARNING: The updated Adafruit MagTag 2025 Edition will not work with CircuitPython 9.2.x or earlier. Make sure you install 10.x.x or later!
Click the buttons above to download the latest .BIN and .UF2 file
As of 12/11/25 this project requires the absolute newest build of 10.x CircuitPython. A suitable version can be obtained from the buttons above.
(depending on how you program the ESP32S2 board you may need one or the other, might as well get both)
Download and save it to your desktop (or wherever is handy).
Plug your MagTag into your computer using a known-good USB cable.
A lot of people end up using charge-only USB cables and it is very frustrating! So, make sure you have a USB cable you know is good for data sync.
This is by far the easiest way to load CircuitPython. However, it requires your board has the UF2 bootloader installed. Some early boards do not (we hadn't written UF2 yet!) - in which case you can load using the built in ROM bootloader.
Still, try this first!
Make sure that you update the TinyUF2 Bootloader before following these steps for the UF2 bootloader!
Loading CircuitPython by drag-n-drop UF2 bootloader is the easier way and we recommend it. If you have a MagTag where the front of the board is black, your MagTag came with UF2 already on it.
Launch UF2 by double-clicking the Reset button (the one next to the USB C port). You may have to try a few times to get the timing right.
If the UF2 bootloader is installed, you will see a new disk drive appear called MAGTAGBOOT.
Copy the UF2 file you downloaded at the first step of this tutorial onto the MAGTAGBOOT drive.
If you're using Windows and you get an error at the end of the file copy that says Error from the file copy, Error 0x800701B1: A device which does not exist was specified. You can ignore this error, the bootloader sometimes disconnects without telling Windows, the install completed just fine and you can continue. If it’s really annoying, you can also upgrade the bootloader (the latest version of the UF2 bootloader fixes this warning).
Your board should auto-reset into CircuitPython, or you may need to press reset. A CIRCUITPY drive will appear. You're done! Go to the next pages.
If you have an original MagTag with while soldermask on the front, we didn't have UF2 written for the ESP32S2 yet so it will not come with the UF2 bootloader.
You can upload with esptool to the ROM (hardware) bootloader instead!
Follow the initial steps found in the Run esptool and check connection section of the ROM Bootloader page to verify your environment is set up, your board is successfully connected, and which port it's using.
In the final command to write a binary file to the board, replace the port with your port, and replace "firmware.bin" with the file you downloaded above.
The output should look something like the output in the image.
Press reset to exit the bootloader.
Your CIRCUITPY drive should appear!
You're all set! Go to the next pages.
If for some reason you cannot get esptool to run, you can always try using the Chrome-browser version of esptool we have written. This is handy if you don't have Python on your computer, or something is really weird with your setup that makes esptool not run (which happens sometimes and isn't worth debugging!) You can follow along on the Web Serial ESPTool page and either load the UF2 bootloader and then come back to Option 1 on this page, or you can download the CircuitPython BIN file directly using the tool in the same manner as the bootloader.
CircuitPython works with WiFi-capable boards to enable you to make projects that have network connectivity. This means working with various passwords and API keys. As of CircuitPython 8, there is support for a settings.toml file. This is a file that is stored on your CIRCUITPY drive, that contains all of your secret network information, such as your SSID, SSID password and any API keys for IoT services. It is designed to separate your sensitive information from your code.py file so you are able to share your code without sharing your credentials.
CircuitPython previously used a secrets.py file for this purpose. The settings.toml file is quite similar.
Your settings.toml file should be stored in the main directory of your CIRCUITPY drive. It should not be in a folder.
This section will provide a couple of examples of what your settings.toml file should look like, specifically for CircuitPython WiFi projects in general.
The most minimal settings.toml file must contain your WiFi SSID and password, as that is the minimum required to connect to WiFi. Copy this example, paste it into your settings.toml, and update:
your_wifi_ssid
your_wifi_password
CIRCUITPY_WIFI_SSID = "your_wifi_ssid"
CIRCUITPY_WIFI_PASSWORD = "your_wifi_password"
Many CircuitPython network-connected projects on the Adafruit Learn System involve using Adafruit IO. For these projects, you must also include your Adafruit IO username and key. Copy the following example, paste it into your settings.toml file, and update:
your_wifi_ssid
your_wifi_password
your_aio_username
your_aio_key
CIRCUITPY_WIFI_SSID = "your_wifi_ssid"
CIRCUITPY_WIFI_PASSWORD = "your_wifi_password"
ADAFRUIT_AIO_USERNAME = "your_aio_username"
ADAFRUIT_AIO_KEY = "your_aio_key"
Some projects use different variable names for the entries in the settings.toml file. For example, a project might use ADAFRUIT_AIO_ID in the place of ADAFRUIT_AIO_USERNAME. If you run into connectivity issues, one of the first things to check is that the names in the settings.toml file match the names in the code.
Not every project uses the same variable name for each entry in the settings.toml file! Always verify it matches the code.
Here is an example settings.toml file.
# Comments are supported
CIRCUITPY_WIFI_SSID = "guest wifi"
CIRCUITPY_WIFI_PASSWORD = "guessable"
CIRCUITPY_WEB_API_PORT = 80
CIRCUITPY_WEB_API_PASSWORD = "passw0rd"
test_variable = "this is a test"
thumbs_up = "\U0001f44d"
In a settings.toml file, it's important to keep these factors in mind:
Strings are wrapped in double quotes; ex: "your-string-here"
Integers are not quoted and may be written in decimal with optional sign (+1, -1, 1000) or hexadecimal (0xabcd)
Floats (decimal numbers), octal (0o567) and binary (0b11011) are not supported
Use \u escapes for weird characters, \x and \ooo escapes are not available in .toml files
Example: \U0001f44d for 👍 (thumbs up emoji) and \u20ac for € (EUR sign)
Unicode emoji, and non-ASCII characters, stand for themselves as long as you're careful to save in "UTF-8 without BOM" format
When your settings.toml file is ready, you can save it in your text editor with the .toml extension.
In your code.py file, you'll need to import the os library to access the settings.toml file. Your settings are accessed with the os.getenv() function. You'll pass your settings entry to the function to import it into the code.py file.
import os

print(os.getenv("test_variable"))
In the upcoming CircuitPython WiFi examples, you'll see how the settings.toml file is used for connecting to your SSID and accessing your API keys.
To use the application, you need to obtain code.py with the program, and the quotes_data/ folder with zipped CSV files in it to place on the MagTag CIRCUITPY drive.
Thankfully, this can be done in one go. In the example below, click the Download Project Bundle button below to download the necessary libraries and the code.py file in a zip file.
Connect your board to your computer via a known good data+power USB cable. The board should show up in your File Explorer/Finder (depending on your operating system) as a flash drive named CIRCUITPY.
Extract the contents of the zip file, copy the lib directory files to CIRCUITPY/lib. Copy the code.py and quotes_data/ folder to your CIRCUITPY drive. The program should self-start.
This project uses brand new functionality in the adafruit_display_text library. The MagTag device has an older version of the library without the necessary features frozen in to its firmware. In order for the project to work you must place the adafruit_display_text folder in the root of CIRCUITPY instead of inside of the lib/ folder like normal.
# SPDX-FileCopyrightText: 2025 Tim C, written for Adafruit Industries
#
# SPDX-License-Identifier: MIT
"""
Literature Quotes Clock for the Adafruit MagTag

This project displays the current time by showing a quote from a book
that references the time. Every minute of the day has a different quote.
The current time reference portion of the quote is accented with an outline
to make it easier to see at a glance.

This project was inspired by:
 - https://github.com/JohannesNE/literature-clock
 - https://www.instructables.com/Literary-Clock-Made-From-E-reader/

The quotes were sourced originally by The Guardian:
https://www.theguardian.com/books/table/2011/apr/21/literary-clock?CMP=twt_gu
"""
import os
import random
import time
import zlib

import displayio
import rtc
import socketpool
import supervisor
import terminalio
import wifi

import adafruit_ntp
from adafruit_display_text.bitmap_label import Label
from adafruit_display_text import wrap_text_to_pixels

# Set the current offset for your timezone
TZ_OFFSET_FROM_UTC = -6


def which_line_contains(all_lines, important_passage):
    """
    Find the line that contains the important passage
    :param all_lines: The lines to search
    :param important_passage: The passage to search for
    :return: The index of the line that contains the important passage
      or None if it was not found
    """

    index_within_spaced_version = " ".join(all_lines).find(important_passage)

    working_index = 0
    for i in range(len(all_lines)):
        line = all_lines[i]
        if working_index <= index_within_spaced_version < working_index + len(line):
            return i
        working_index += len(line) + 1  # extra 1 for the newline

    return None


def find_lines_to_show(all_lines, important_passage):
    """
    Find the line that contains ``important_passage`` and return
    the start of the range of 7 lines that provides the largest possible
    context around it.

    :param all_lines: The lines to search
    :param important_passage: The passage to search for
    :return: index of the first line in a range of 7 lines with the widest context.
    """
    if len(all_lines) <= 7:
        return 0

    try:
        passage_line = which_line_contains(all_lines, important_passage)
        if passage_line <= 3:
            return 0
    except TypeError as e:
        raise TypeError(f"ip: {important_passage} | {all_lines}") from e

    if passage_line >= len(all_lines) - 4:
        return len(all_lines) - 7

    return passage_line - 3


display = supervisor.runtime.display

# WIFI Setup
wifi_ssid = os.getenv("CIRCUITPY_WIFI_SSID")
wifi_password = os.getenv("CIRCUITPY_WIFI_PASSWORD")
if wifi_ssid is None:
    print("WiFi credentials are kept in settings.toml, please add them there!")
    raise ValueError("SSID not found in environment variables")

try:
    wifi.radio.connect(wifi_ssid, wifi_password)
except ConnectionError:
    print("Failed to connect to WiFi with provided credentials")
    raise

# Wait a few seconds for WIFI to finish connecting and be ready
time.sleep(2)

# Fetch time from NTP
pool = socketpool.SocketPool(wifi.radio)
ntp = adafruit_ntp.NTP(
    pool,
    server="0.adafruit.pool.ntp.org",
    tz_offset=TZ_OFFSET_FROM_UTC,
    cache_seconds=3600,
)

# Update the system RTC from the NTP time
rtc.RTC().datetime = ntp.datetime

# main group to hold all other visual elements
main_group = displayio.Group()

# background group used for white background behind the quote
# scale 8x to save memory on the Bitmap
bg_group = displayio.Group(scale=8)

# Create & append Bitmap for the white background
bg_bmp = displayio.Bitmap(display.width // 8, display.height // 8, 1)
bg_palette = displayio.Palette(1)
bg_palette[0] = 0xFFFFFF
bg_tg = displayio.TileGrid(bg_bmp, pixel_shader=bg_palette)
bg_group.append(bg_tg)
main_group.append(bg_group)

# Setup accent palette for the outlined text
accent_palette = displayio.Palette(5)
accent_palette[3] = 0x666666
accent_palette[4] = 0xFFFFFF

# Setup BitmapLabel to show the quote
quote_lbl = Label(
    terminalio.FONT, text="", color=0x666666, color_palette=accent_palette
)
quote_lbl.anchor_point = (0, 0)
quote_lbl.anchored_position = (2, 2)
main_group.append(quote_lbl)

# Setup BitmapLabel to show book title and author
book_info_lbl = Label(terminalio.FONT, text="", color=0x666666)
book_info_lbl.anchor_point = (0, 1.0)  # place it at the bottom of the display
book_info_lbl.anchored_position = (2, display.height - 2)
main_group.append(book_info_lbl)

# Set main group containing visual elements to show on the display
display.root_group = main_group

while True:
    # get the current time from system RTC
    now = time.localtime()

    # break out the current hour in 24hr format
    hour = f"{now.tm_hour:02d}"

    # open the data file for the current hour
    with open(f"quotes_data/{hour}.csv.gz", "rb") as f:
        # read and unzip the data
        compressed_data = f.read()
        rows = zlib.decompress(compressed_data).split(b"\n")

    # break out the current minute
    current_minute = f"{now.tm_min:02d}".encode("utf-8")

    print(f"hour: {hour} min: {current_minute}")

    # list to hold possible quotes for the current time
    options = []

    # get the previous minute also for alternate choices
    previous_minute = f"{now.tm_min - 1:02d}".encode("utf-8")
    # list to hold alternate choices
    alternates = []

    # loop over all rows in the data from the CSV
    for row in rows:
        # if the current row is for the current time
        if row[3:5] == current_minute:
            # add the current row as a potential choice to show
            options.append(row)

        # if the current row is for the previous minute
        if row[3:5] == previous_minute:
            # add the current row as an alternate choice
            alternates.append(row)

    # if there is at least one option for the current time
    if len(options) > 0:
        # make a random choice from the possible quote options
        choice = random.choice(options)

    else:  # No options for current time
        # use a random choice from the previous minute instead
        choice = random.choice(alternates)

    # decode the row of data from bytes to a string
    row_str = choice.decode("utf-8")

    # split the data on the pipe character
    parts = row_str.split("|")

    # extract the quote text
    quote = parts[2]

    # extract the author
    author = parts[4]

    # extract the book title
    title = parts[3]

    # extract the current time reference string
    time_part = parts[1]

    # get start and end indexes of the time reference
    time_start_index = quote.find(time_part)
    time_end_index = time_start_index + len(time_part)

    # split the quote text into lines with a maximum width that fits
    # on the MagTag display
    quote_lines = wrap_text_to_pixels(
        quote,
        display.width - 4,
        terminalio.FONT,
        outline_accent_ranges=[
            (time_start_index, time_end_index, quote_lbl.outline_size)
        ],
    )

    # remove previous accents
    quote_lbl.clear_accent_ranges()

    # find the index of the first line we want to show.
    # only relevant for long quotes, short ones will be shown in full
    first_line_to_show = find_lines_to_show(quote_lines, time_part)

    # Temporary version of final visible quote joined with spaces instead of newlines,
    # so we can search for the time_part without worrying about potential newlines.
    shown_quote_with_spaces = " ".join(
        quote_lines[first_line_to_show: first_line_to_show + 7]
    )

    # find the current time reference within the quote that will be shown
    time_start_index = shown_quote_with_spaces.find(time_part)
    time_end_index = time_start_index + len(time_part)

    # wrap the quote to be shown to multiple lines and set it on the label
    quote_lbl.text = "\n".join(quote_lines[first_line_to_show: first_line_to_show + 7])

    # accent the part of the quote that references the current time
    quote_lbl.add_accent_range(time_start_index, time_end_index, 4, 3, "outline")

    # show title and author in the book info label
    # allow it to split to two lines if the quote is short enough
    if len(quote_lines) <= 6:
        book_info = f"{title} - {author}"
        book_info_lbl.text = "\n".join(wrap_text_to_pixels(
            book_info,
            display.width - 4,
            terminalio.FONT,
        ))
    else:
        book_info_lbl.text = f"{title} - {author}"

    # update the display and wait 60 seconds
    display.refresh()
    time.sleep(60)
After copying the files, your drive should look like the listing below. It can contain other files as well but must contain these at a minimum.
This project uses brand new functionality in the adafruit_display_text library. The MagTag device has an older version of the library without the necessary features frozen in to its firmware. In order for the project to work you must place the adafruit_display_text folder in the root of CIRCUITPY instead of inside of the lib/ folder like normal.
The WiFi SSID and password are looked up from the settings.toml file using os.getenv() and a connection is made to the specified network. Once connected, the adafruit_ntp module is used to get the current time from an NTP server. The current time is set onto rtc.RTC().datetime so that the internal real-time clock (RTC) will continue to track the time moving forward.
The graphics are comprised of 3 main elements:
A white background rendered behind all of the text. The background Bitmap is 1/8 the size of the display and the TileGrid for it is put into a Group that has been scaled to 8x. This allows it to consume less RAM but still cover the full display.
The main quote label at the top of the display. This is a BitmapLabel that makes use of accented ranges within the text to outline the section that contains the reference to the current time. The quote is wrapped to lines that are the width of the display before being shown.
The book info label at the bottom of the display. Another BitmapLabel, this one at the bottom of the display shows the book title and author for the current quote. This one will get wrapped to two lines if the title and author are long enough and the current quote is short enough to provide the room for it.
There are two helper functions inside of code.py: which_line_contains() and find_lines_to_show().
which_line_contains() accepts a list of all_lines to search through, and an important_passage string that contains a value to search for. It will search the provided lines for the specified string and return the index of the line where the string begins. If the string isn't found at all, it will return None. This is used to find where within the full quote the section that references the current time is at.
find_lines_to_show() also accepts a list of all_lines and an important_passage. This function finds up to 7 lines surrounding the current time reference that provide the largest context. Some of the quotes are longer than 7 lines, which is all the room available on the MagTag display. This chooses the lines to show in the event that the quote is too long, ensuring that it will always select the line(s) that contain the current time reference and as much surrounding them as is possible.
The data files which contain the quotes are zipped .csv files. They are separated by the pipe character | instead of commas. That makes it easier to deal with potential commas that could be found in the quotes themselves. There is one zipped file for each hour of the day. They are named with the number of their hour e.g., 0.csv.zip, 1.csv.zip, ..., 23.csv.zip. After being unzipped the files contain 1 quote per row. The rows look like this:
00:00|Midnight|She looked at the digital display of her watch. 00:00:00 Midnight, as the clock had told her. She waited for the next second to arrive, but it didn't.|The Midnight Library|Matt Haig|unknown
The pipes split the row into these different data fields:
Time of day in 24-hour notation i.e., 00:00 or 15:42.
The sub-string within the quote that refers to the current time. Sometimes it's a word or phrase, other times it's a literal time string like "10:27 a.m.".
The full quote.
The title of the book that the quote comes from.
The author of the book.
Whether the quote contains non-kid-friendly references, though many of them are "unknown", so this portion of the data is incomplete.
During each iteration of the main loop, the code will check the current time from the RTC and break out the current hour and minute components. It will use the hour component to select the correct data zip file, then open the file read its contents and decompress them using the zlib module. Next, it searches through the list of quotes in the data to find the ones that refer to the current time, building a list of options containing quotes to choose from. A list of alternates containing the quotes for the previous minutes is also compiled because there are a few minutes out of the day with no quote. When those occur, the clock will show a quote from the previous minute instead. A random quote is selected from the compiled lists.
The data from the selected quote is parsed out of the CSV format and each of the relevant bits is stored in a separate variable: quote, author, title, time_part. Using the helper functions mentioned above, the quote is wrapped into multiple lines that fit on the display and the lines to show are selected. The start and end index of the current time reference are calculated and stored in time_start_index and time_end_index. Finally, the selected lines are put into the quote label, and an accent range is added to the portion that refers to the current time. The accent uses a 1 pixel dark outline around light text for contrast from the standard dark text color used by the rest of the quote. The author and title are placed into the book info label. After refreshing the display, the code waits for 60 seconds and then does it all over again.
Near the top of the code.py file you'll find these lines for the timezone offset:
# Set the current offset for your timezone
TZ_OFFSET_FROM_UTC = -6
Update the variable with the offset from UTC for your time zone. Keep in mind that many timezones observe daylight savings time which changes their offset from UTC when daylight savings change occurs. For example, the US central timezone fluctuates between -6 and -5 from UTC depending on the time of year. You will need to change this value manually; it will not account for DST automatically.
This project does not aim to be low power. It is best to run the clock connected to a permanent power source rather than trying to run it off a battery. If you wanted to experiment with a lower powered battery version, you could try changing it to update only every 5 minutes or so, and to use deep sleep in between updates.